Hol Dir den wöchentlichen SPARTANAT-Newsletter.
Dein Bonus: das gratis E-Book von SPARTANAT.
TRAINING MIT KL STRATEGIC (7.3): WAS TUN MIT ZIELFERNROHREN
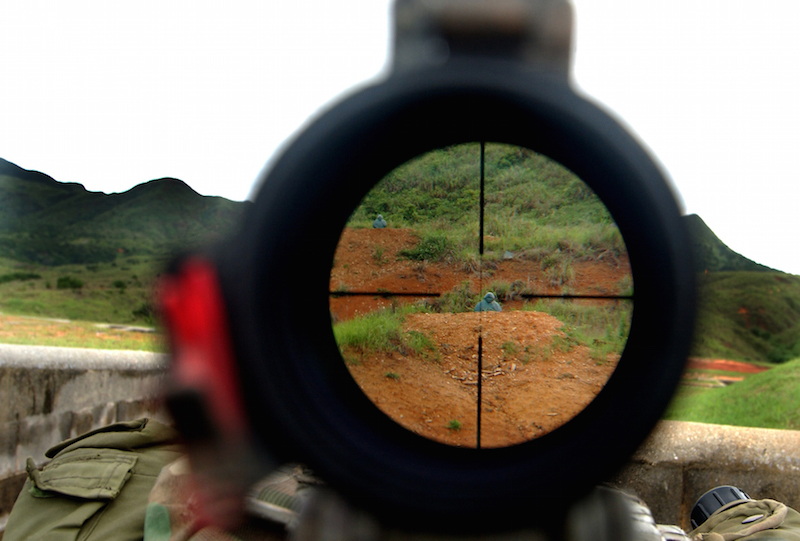
Im dritten Teil zum Thema Zielen – deswegen Artikel Nummer 7.3 – befassen wir uns mal mit den Zielfernrohren. Diese Zielhilfen für mittlere bis große Entfernungen haben inzwischen sehr viel mehr zu bieten, als bloß das Ziel zu vergrößern und eine Zielmarkierung darauf auszurichten.

Im dritten Teil zum Thema Zielen – deswegen Artikel Nummer 7.3 – befassen wir uns mal mit den Zielfernrohren. Diese Zielhilfen für mittlere bis große Entfernungen haben inzwischen sehr viel mehr zu bieten, als bloß das Ziel zu vergrößern und eine Zielmarkierung darauf auszurichten. Was sie alles können und die Grundlagen zur Nutzung werden im Folgenden etwas näher beleuchtet.
Montage
Die Nutzung eines Zielfernrohrs beginnt schon mit der korrekten Montage. Bereits hier kann man einige Fehler machen, die sich später gravierend auswirken können. Grundlegend gilt: Wer billig kauft, kauft zweimal.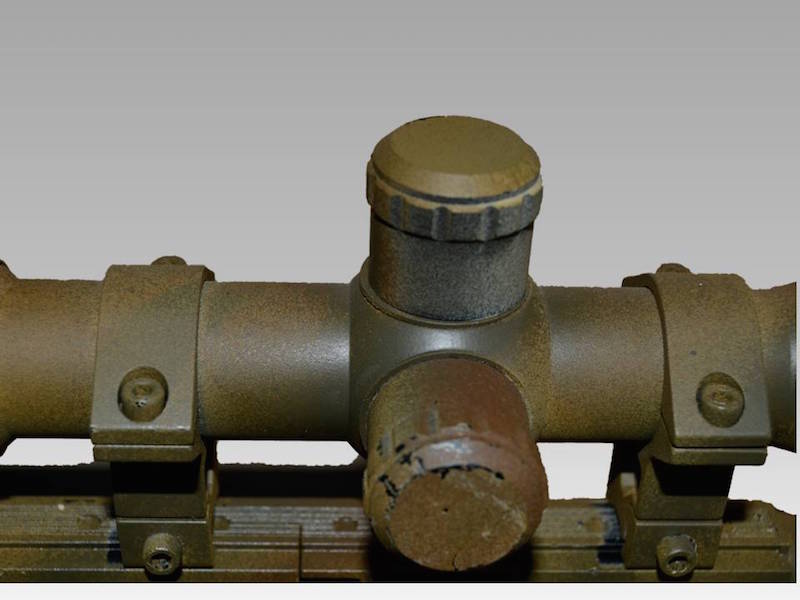
Die Qualität der Montage muss hoch sein, um eine Schussfestigkeit zu garantieren. Dabei geht es nicht nur darum, das die Montage auf der Waffe bleibt, sondern auch darum, dass das Zielfernrohr in der Montage zuverlässig ausgerichtet gehalten wird.
Dabei ist es inzwischen fast nebensächlich, ob man ein-oder mehrteilige Montagen nutzt. Heutzutage sind auch hochwertige Schnellmontagen so zuverlässig, dass sie durchaus zu empfehlen sind. Dies war nicht immer der Fall. Gerade Schnellmontagen haben in der Vergangenheit öfter zu Problemen geführt, da diese nicht wiederholgenau montiert werden konnten. Dies lag vor allem daran, dass man sie nicht immer gleichmäßig lösen und befestigen konnte, so dass die Montage an sich schon leicht unterschiedliche Positionen auf der Waffe einnahm, jedes mal, wenn man sie löste oder befestigte. Daraus resultierend musste nach jeder neuen Montage die Waffe neu eingeschossen werden und die Schussfestigkeit war nur selten vergleichbar mit festen Montagen.
Dies hat sich inzwischen geändert, so dass man heute auch bei Schnellmontagen namenhafter Hersteller entsprechend gute Qualität erhält. Nichts desto Trotz bleibt die Empfehlung, entweder die Montage nicht dauernd zu lösen, bzw. die Justierung regelmäßig – mindestens jedoch nach jeder neuen Befestigung – zu überprüfen.
Ist die entsprechende Montageart festgelegt, geht es darum, die korrekte Höhe zu ermitteln. Dabei gilt, dass ein Zielfernrohr (Glas) immer so tief wie möglich auf der Waffe montiert werden sollte. Hierzu kann der Büchsenmacher des Vertrauens entsprechende Hilfestellung geben. Grundsätzlich jedoch kann die Mindesthöhe relativ einfach ermittelt werden, indem man den größten Durchmesser des Glases (i.d.R. Okkulardurchmesser) halbiert und 2-4mm dazu addiert. Somit ist sicher gestellt, dass das Glas möglichst tief auf der Waffe sitzt, den Lauf aber nicht direkt berührt.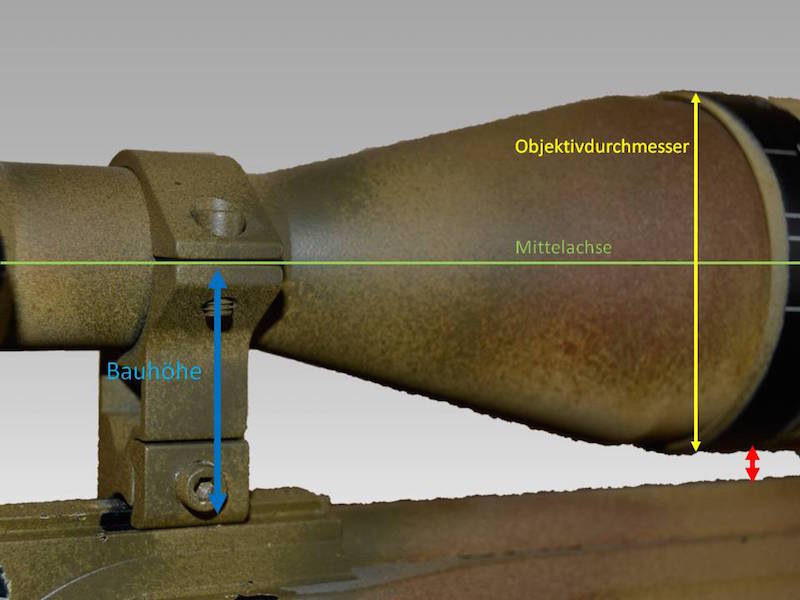
Es gilt zudem zu beachten, wie die Bauweise der Waffe ist; gegebenenfalls benötigt man unterschiedliche Bauhöhen, weil die Montagepunkte unterschiedliche Abstände zur Rohrseelenachse haben (z.B. Remington 700).
Sind die Grundlagen gelegt, geht es an die eigentliche Montage. Auch hier lauern diverse Fallen, in die man als unbedarfter Schütze tappen kann und die später zu Zielfehlern bzw. Schussablagen führen.
Ziel der Montage ist ein korrekter Augenabstand im entspannten Anschlag. Hier lauert Fehlerpotential in zwei Formen:
- Verkrampfter Anschlag
Wird der Anschlag den baulichen Begebenheiten der Waffe angepasst, kommt es zwangsläufig zu unnötigen Zwangshaltungen, die nicht reproduzierbar sind und damit zu Zielfehlern bzw. Abweichungen führen.
Die Grundlage, dass ein Zielfernrohr so tief wie möglich montiert wird, reicht oftmals nicht aus, um gerade und zentriert durch das Glas zu blicken.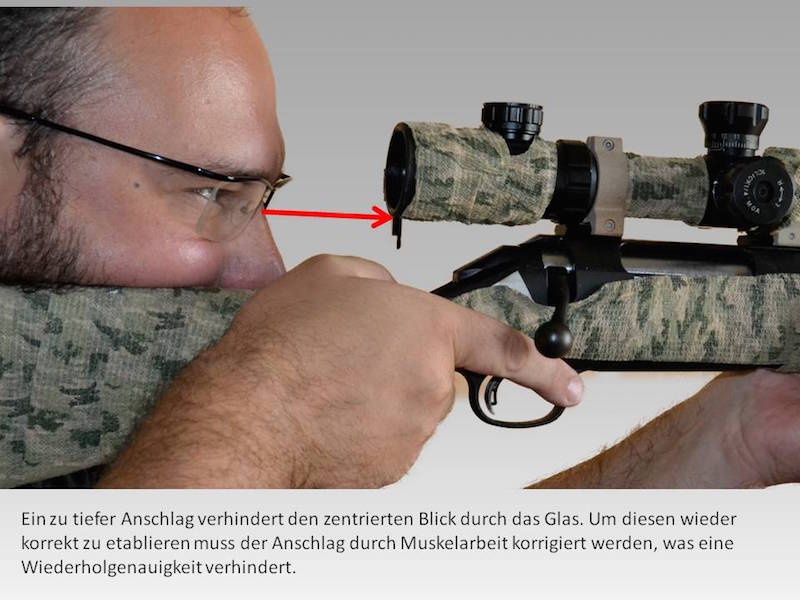
Dies kann durch erhöhte/verstellbare Schaftbacken/Wangenauflagen kompensiert werden. Hierzu gibt es diverse Anbieter und Modelle auf dem Markt; jedoch sind auch Eigenbaulösungen oftmals die kostengünstige und individuell passendste Variante. Ziel hierbei ist es, in dem am häufigsten verwendeten Anschlag entspannt zentriert durch das Glas zu blicken, ohne eine unnötige Zwangshaltung einzunehmen.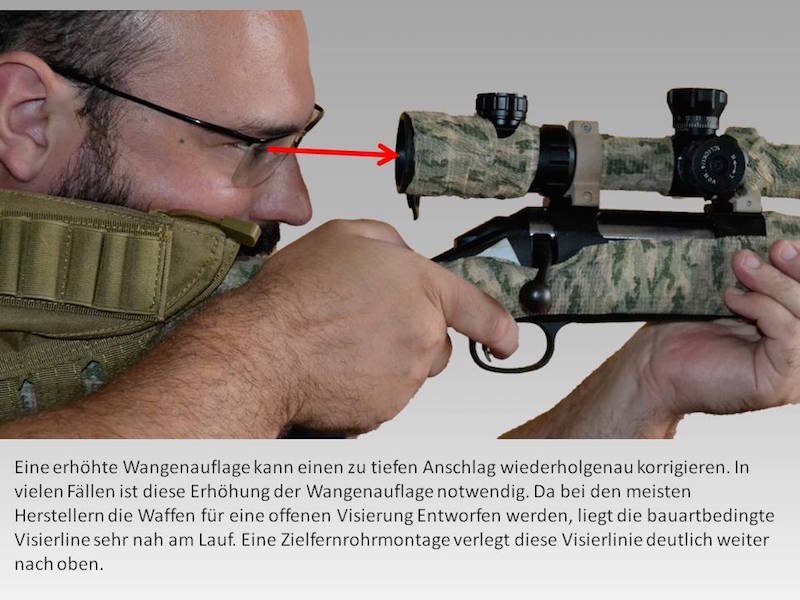
- Falscher Augenabstand zum Zielfernrohr
Ein falscher Augenabstand zum Glas führt zwangsläufig zu Zielfehlern. Ein zu großer Abstand schränkt das Sehfeld über die Maßen ein, so dass klassische Zielfehler nicht mehr erkannt werden, ein zu geringer Abstand führt zu Parallaxefehlern und kann – je nach Kaliber – ggf. zu Verletzungen führen, da das Okular durch den Rückstoß in das Gesicht zurückschlägt.
In den Beschreibungen der Zielfernrohre wird in der Regel ein korrekter Abstand bzw. Abstandsbereich angegeben.
Sind Höhe und Augenabstand korrekt etabliert, kann die eigentliche Montage erfolgen, indem die Ringe um den Glastubus über Kreuz festgeschraubt werden, um einen gleichmäßigen Anpressdruck zu gewährleisten. Es Empfiehlt sich auch, die Schrauben mit entsprechenden Mitteln – z.B. Loctite blau – gegen Lösen zu sichern.
Ist dies erfolgt, wartet schon die nächste Fehlerquelle; die korrekte Sehschärfeneinstellung. Diese erfolgt normalerweise einmalig für den jeweiligen Schützen/die jeweilige Schützin und muss nur dann geändert werden, wenn sich die eigene Sehschärfe ändert. Zur Einstellung wird der Einstellring in einen Endanschlag gebracht und durch das Glas ein Ziel anvisiert. Die Entfernung spielt hierbei keine Rolle. Dann wird die Sehschärfe so lange verstellt, bis Absehen und Ziel auf Anhieb klar zu sehen sind. Es ist dabei darauf zu achten, dass die Klarheit sofort auf den ersten Blick vorhanden ist, bevor das Auge anfängt eventuelle Abweichungen zu kompensieren. Ist diese Einstellung gefunden, empfiehlt es sich, diese auf dem Glas zu markieren.
Parallaxe
Nun ist das gewählte Glas montiert und kann endlich verwendet werden, doch auch hier gibt es diverse Möglichkeiten, den sicheren Treffer zu vergeigen.
Neben den klassischen Zielfehlern kann ein falscher Parallaxeausgleich zu Abweichungen in der Trefferlage führen. Da das Absehen in einem Zielfernrohr in einer Bildebene (1. oder 2 Bildebene) kann es bei einer fehlerhaften Einstellung dazu kommen, dass das Absehen – je nach Winkel des Einblicks – sich auf dem Ziel verschiebt. Dies wird als Parallaxe bezeichnet und tritt bei Zielfernrohren mit verstellbaren Vergrößerungen auf. Aus diesem Grund verfügen derartige Gläser über einen sogenannten Parallaxeausgleich, über den auf verschiedene Entfernungen die Absehenprojektion korrigiert werden kann, vereinfacht gesagt, werden die Bildebenen über das Linsensystem des Zielfernrohrs so zueinander ausgerichtet, dass ein scharfes Bild entsteht und damit verbunden auch das Absehen entsprechend der jeweiligen Entfernung fix in der jeweiligen Bildebene zu sehen ist.
Kontrollieren kann der Schütze den korrekten Parallaxeausgleich, indem er nach erfolgter Einstellung den Kopf im Anschlag leicht bewegt. Verschiebt sich das Absehen über dem Ziel, ist die Parallaxe nicht korrekt ausgeglichen.
Der Parallaxeausgleich kann aber auch für die schnelle Entfernungsermittlung genutzt werden. Wie bereits angedeutet, wird über den Parallaxeausgleich auch die Bildschärfe über die Entfernungen beeinflusst; in der Regel finden sich auf dem Stellrad für den Parallaxeausgleich Entfernungsangaben, welche je nach Qualität des Glases genau oder eher Näherungswerte sind. Hier kann man mit einfachen Mitteln auch Zwischenentfernungen markieren. Die Ermittlung der Entfernung geschieht dadurch, dass man über dieses Stellrad das Bild scharf stellt. Jede Stellung kann dabei einer entsprechenden Entfernung zugeordnet werden.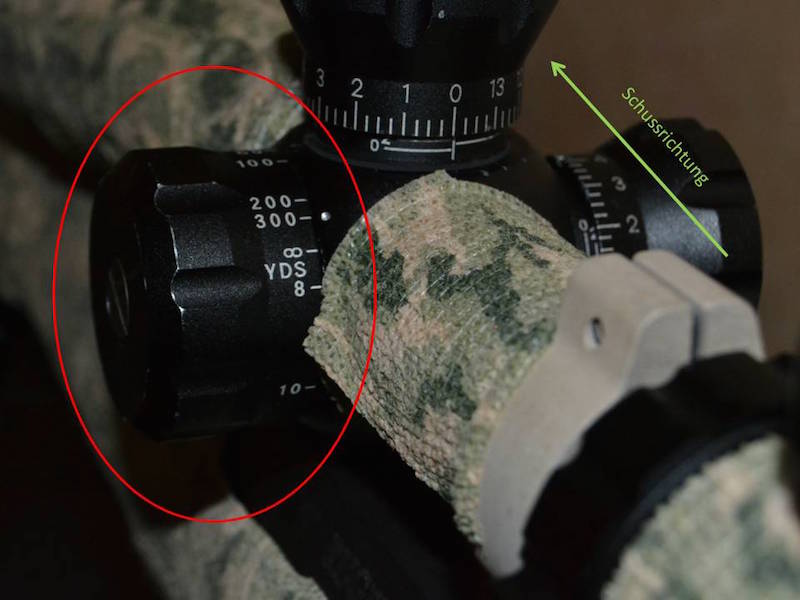
Absehen
Absehen gibt es fast so viele, wie Ziefernrohrmodelle am Markt. Jeder Hersteller entwickelt eigene Strichbilder, um die Produkte einer bestimmten Nutzung optimaler anzupassen. Hinzu kommen die klassischen Absehen aus dem jagdlichen (z.B. Absehen 1 bis 4, Duplex) und behördlichen (z.B. Mildot) Bereich. Je nach Modell befindet sich das Absehen in der ersten oder zweiten Bildebene. Während dies bei simpleren Absehen und Zielfernrohren mit einer festen Vergrößerung nicht auswirkt, spielt die Bildebene des Absehens bei Gläsern mit verstellbarer Vergrößerung eine Rolle, insbesondere wenn das Absehen zur Ermittlung ballistischer Werte und/oder Korrekturen genutzt wird. Während Absehen in der ersten Bildebene (ffp- first/front focal plane) bei der Änderung des Vergrößerungsfaktors mit vergrößert wird, passiert dies bei Absehen in der zweiten Bildebene (sfp-second focal plane) nicht. Im ersten Fall hat das Absehen immer die korrekten Verhältnisse zur Entfernung und kann problemlos genutzt werden. Bei Absehen in der zweiten Bildebene ist dies nicht der Fall. Hier sind die Größenverhältnisse nur in einer Einstellung korrekt. Die jeweilige Einstellung ist normalerweise in der Beschreibung angegeben. Die Lage des Absehens macht sich auch im Preis bemerkbar. Für Absehen in der ersten Bildebene zahlt man normalerweise mehr, als für ein gleiches Glas mit dem Absehen in der zweiten Bildebene.
Die Wahl des Absehens kann also nach persönlichen Vorlieben und der Nutzung aus einer breiten Palette frei gewählt werden. Als Empfehlung gilt: Weniger ist oft Mehr!
Für den Großteil der Anwender reichen einfach strukturierte Absehen vollkommen aus. Es ist in den meisten Anwendungen nicht notwendig, integrierte Entfernungsmarken zu haben, Vorhaltemarken für bewegliche Ziele bis 20, 30 oder 50 km/h, oder aber Entfernungsmarken zum Ausgleich des Geschossabfalls bis zu 1.000 Meter. Nutzt man die Waffe in vordefinierten Entfernungen auf statische Ziele reicht ein gut justiertes Glas mit z.B. einem Absehen 4 vollkommen aus, ebenso weicht die Geschossflugbahn definitiv von dem statistischen Mittel ab, welches für die Erstellung entsprechender Absehen genutzt wird. Somit kann man mit einer durchdachten Wahl des Absehens schon eine Menge an unwichtigen Informationen aus dem späteren Schießablauf herausfiltern.
Natürlich gibt es für jedes Absehen auch einen entsprechenden Anwendungsbereich, so dass diese ihre Berechtigung haben.
Das bekannteste und am häufigsten vertretene Absehen ist das sogenannte „Mil Absehen“. Dieses Absehen wird hauptsächlich behördlich genutzt, findet aber seit Jahren auch immer mehr Einzug in den zivilen Präzisionsbereich.
Das klassische Mildot Absehen hat sich im Laufe der Jahre immer weiter entwickelt und verfeinert im Aussehen; die Nutzung ist jedoch seit Anfang an die Gleiche.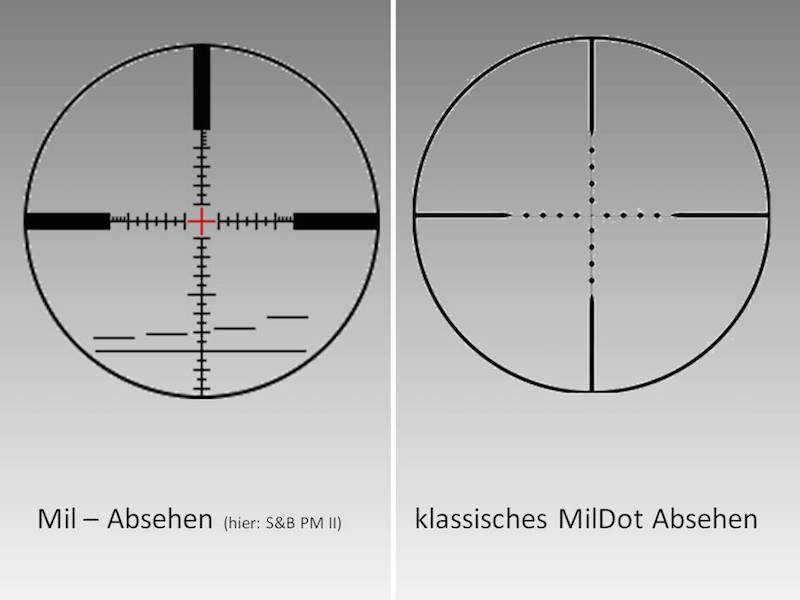
Mil und moa
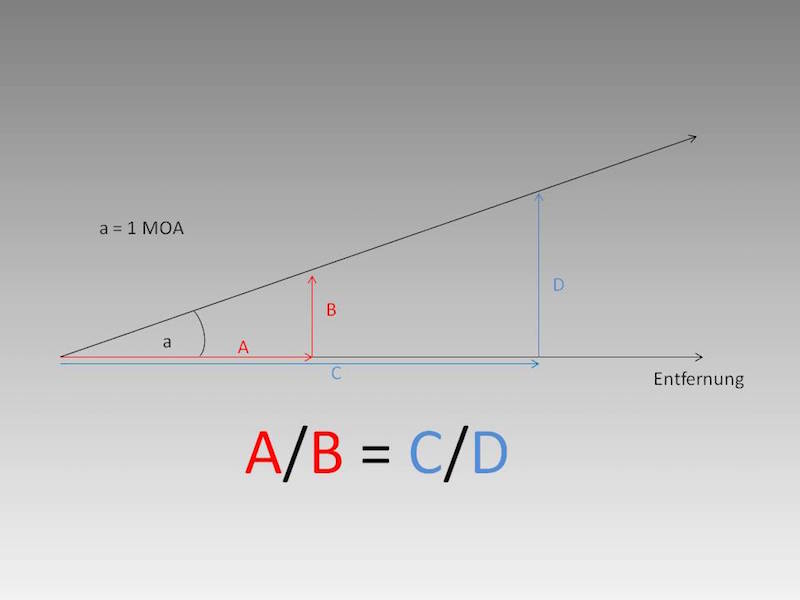
Milliradian (mil) und minute of angle (moa) bezeichnen beide jeweils einen spezifischen Winkelteil, welche basierend auf dem Strahlensatz zur Ermittlung diverser ballistischer Daten genutzt werden.
Milli (= tausendstel) – radian (= Radius) bezeichnet das tausendstel eines spezifischen Winkels im Verhältnis zum zugehörigen Bogensegment. Mil werden in erster Linie dazu genutzt, schnell Entfernungen zu ermitteln und oder Vorhaltemaße zu nutzen, ohne Einstellungen am Zielfernrohr vornehmen zu müssen. Hierzu werden die genormten Mil Absehen genutzt, bei welchen Abstände und Durchmesser der Markierungen eine schnelle Ermittlung ballistischer Daten ermöglichen: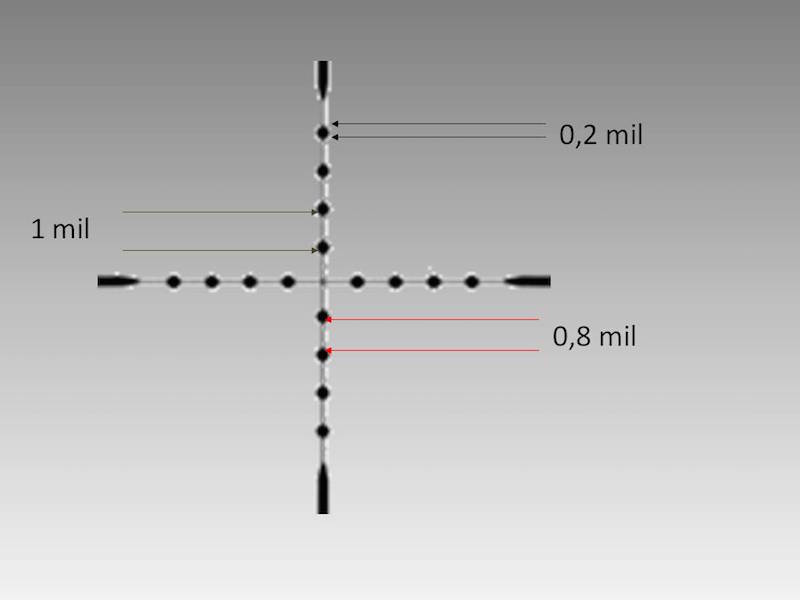
Zur weiteren Erläuterung zur Nutzung von Mil Absehen nutze ich das klassische Mildot Absehen. Die Verfahren sind entsprechend auf andere Absehen anwendbar.
Das Mildot Absehen besteht aus einem klassischen Fadenkreuz, auf welchem sogenannte Mildots ergänzt wurden. Der Abstand von einem Punkt am Mildot zum gleichen Punkt am nächsten Mildot beträgt genau 1 mil. Dies entspricht einer tausendstel Einheit. Dabei ist zu beachten, dass die Einheit hierbei unwesentlich ist; z.B. 1m auf 1000m, 1yd auf 1000yds, 1cm auf 1000cm, 0,1m auf 100m usw.
Der Durchmesser eines Mildot entspricht 0,2 mil, somit entspricht der Abstand zwischen zwei Mildots 0,8 Mil. Mit diesem Wissen kann mithilfe einer einfachen Formel die Entfernung eines Zieles bestimmt werden, vorausgesetzt, man kennt dessen Größe. Ist diese unbekannt, so muss man die Höhe schätzen, wobei gilt, je genauer man schätzt, umso genauer kann man die Entfernung ermitteln. Die zugehörige Formel lautet:
Höhe [m] x 1000 = Entfernung [m]
mil
Hierbei ist zu beachten, dass die eingegebene Größe (m, cm, yd, in, …) auch der ausgegebenen Größe entspricht. Diese Formel funktioniert für alle Längenmaße und sollte Lesern mit einer militärischen Ausbildung nicht unbekannt sein, da die gleiche Formel für Entfernungsermittlungen mit dem Fernglas gilt.
Mit der Änderung des Faktors kann die Eingabe auch in cm erfolgen und die Ausgabe bleibt in m:
Höhe [cm] x10 = Entfernung [m]
mil
Bsp: 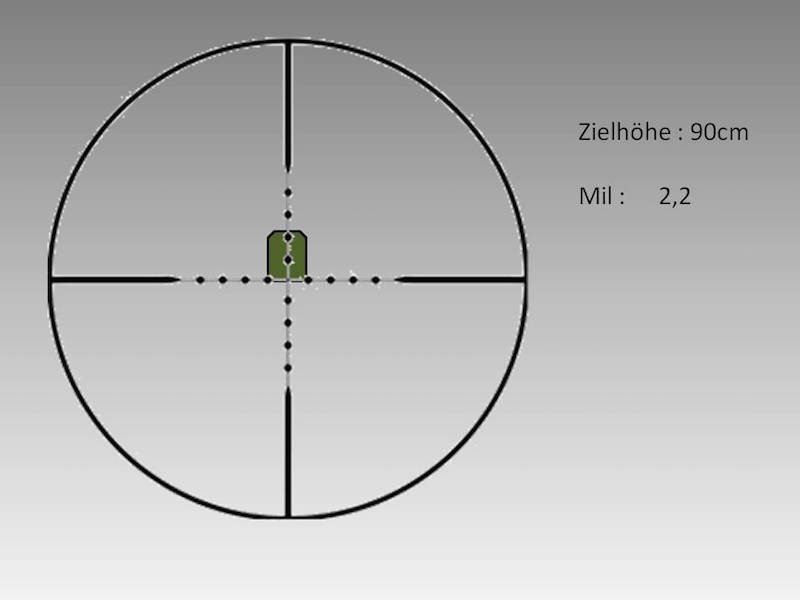
0,9m x 1000 = 409,09 m
2,2 mil
90 cm x 10 = 409,09 m
2,2 mil
Ist die Entfernung eines Zieles bekannt, kann man mit einem einfachen Umstellen der Formel auch dessen Größe bestimmen:
Entfernung [m] x mil = Höhe [m]
1000
Schießt man öfter auf entsprechende Ziele, bietet es sich an, für diese die Ablesungen und Entfernungen im Vorfeld zu ermitteln und schriftlich festzuhalten.
Zielhöhe 1,0m
| Mil | Entfernung |
| 0,5 | 2000m |
| 1 | 1000m |
| 1,5 | 666,67m |
| 2 | 500m |
| 2,5 | 400m |
| 3 | 333,33m |
| 3,5 | 285,71m |
| 4 | 250m |
| 4,5 | 222,22m |
| … | . . . |
Das Mil Absehen kann jedoch auch für Vorhaltemaße genutzt werden, sowohl für den Geschossabfall auf verschiedene Entfernungen, als auch für seitliche Abweichungen durch Windeinfluss oder auch die Coriloliskraft und Bewegungen.
Hierzu ist zunächst ein grundlegendes Verständnis für die Bogeminute (MOA) nötig. Hierbei handelt es sich um eine Größe, welche auf Grundlage eines spezifischen Winkels basierend auf dem Strahlensatz ermittelt wird. Aus diesem Grund ist der resultierende Wert der Abweichung einer spezifischen Bogenminute von der Entfernung abhängig.
Ein MOA entspricht 1 inch auf 100 yards bzw. 2,78 cm auf 100m (Umrechnungsfaktor 1,09361). Mit zunehmender Entfernung vergrößert sich die resultierende Abweichung, entspricht jedoch trotzdem der gleichen Bogenminute
| MOA | Entfernung [yd] | Abweichung [in] | Entfernung [m] | Abweichung [cm] |
| 1 | 100 | 1 | 100 | 2,78 |
| 1 | 200 | 2 | 200 | 5,56 |
| 1 | 300 | 3 | 300 | 8,35 |
| 1 | 400 | 4 | 400 | 11,12 |
| 1 | 500 | 5 | 500 | 13,90 |
| … | … | … | … | … |
Die Bogenminute (MOA) stellt i.d.R. die Basis für die Höhen- und Seitenverstellung von Zielfernrohren dar. Die am häufigsten vorkommenden Einstellmöglichkeiten sind ¼ bzw. 1/8 MOA pro Click, d.h. für die Verstellung eum ein MOA auf eine spezifische Entfernung sind 4 bzw. 8 Clicks notwendig.
Kennt man den spezifischen Geschossabfall der verwendeten Munition aus der eigenen Waffe auf die jeweiligen Entfernungen (NICHT die Näherungswerte auf der Munitionsverpackung!), so kann man unter Verwendung der Verstellmöglichkeiten des Zielfernrohrs die jeweilige Abweichung kompensieren.
Bsp:
Geschossabfall auf 200m Entfernung = 4,17cm
1 MOA auf 200m = 5,56cm
4,17cm/5,56cm = 0,75
Auf 200m Entspricht also der Geschossabfall 0,75 bzw. ¾ MOA. Bei einer Höhenverstellung von 4 Clicks/ MOA (1/4 MOA pro Click) entspricht dies also einer Höhenverstellung von 3 Clicks.
Nutzt man nun ein Mil Absehen, kann man dieses für die schnelle Korrektur ohne Einstellung des Glases nutzen. Hierzu ist es notwendig, die ermittelten MOA in Mil umzurechnen. Dies funktioniert über den Faktor 3,375, was ein theoretischer Rundungswert ist. ; d.h. ~3,375 MOA = 1 Mil. Ein weiterer Umrechenfaktor ist 3,44, welcher darauf basiert, dass ein MOA = 0,29 Mil entspricht. Auch dies ist ein Rundungswert, welcher als hinreichend genau angesehen werden kann. Feldmäßig kann auch mit einem hinreichend genauen Wert von 3,5 gerechnet werden.
Alle diese Werte basieren auf der Grundlage, dass ein Vollkreis aus 6400 mil besteht, was bereits ein theoretischer Rundungswert ist. Aus diesem Grund kann getrost mit einem Wert von 3,4 bzw. 3,5 feldmäßig gerechnet werden.
Gehen wir nun zurück zu unserem Beispiel, um diese Umrechnung auf unser Mil Absehen anzuwenden:
1 Mil/ 3,4 MOA = X Mil /0,75 MOA
(1 Mil x 0,75 MOA) / 3,4 MOA = 0,221 Mil
Das bedeutet, um den Geschossabfall auf 200 zu kompensieren, muss man um ~0,2 mil kompensieren. Dies entspricht bei einem Mildot Absehen dem Durchmesser eines Dots.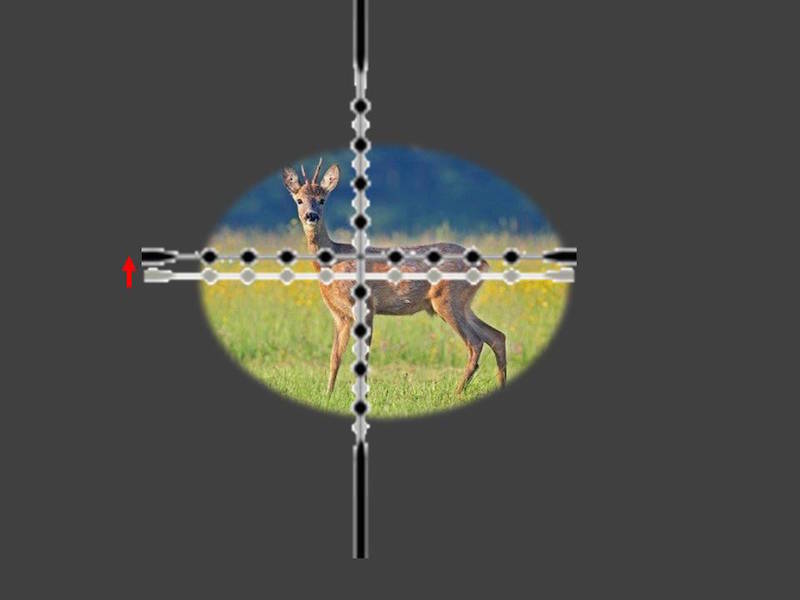
Um diese Kompensation mit einem anders gearteten Mil Absehen zu kompensieren, muss man sich nur darüber informieren, in welchen Abständen die jeweiligen Marken des Absehens angebracht sind und die ermittelten Werte entsprechend anwenden.
Um Zeit und Arbeit zu sparen, gibt es diverse Hilfstools, um gewisse Berechnungen und Ermittlungen schnell durchzuführen. Der Mildot Rechner oder verschiedenste ballistische Rechenprogramme sind nur ein kleiner Teil dieses riesigen Angebots. Doch hat man ein Mindestmaß an persönlichen Ambitionen, so ist die Ermittlung der tatsächlichen ballistischen Daten der genutzten Munition das Mindeste, was man selber durchführen muss; ganz davon abgesehen, dass es durchaus seinen Reiz hat, das volle Potential des teuren Glases auszunutzen, indem man sich mit der Materie eingehend beschäftigt und die eigenen ballistischen Daten ermittelt, errechnet und verifiziert.
Justierung
Die korrekte Justierung des Zielfernrohres ist essentiell für die Nutzung. Jeder Nutzer einer Waffe mit Zielfernrohr sollte in der Lage sein, diese Einfache aber immens wichtige Arbeit durchzuführen. Hierzu sind folgende Schritte nötig:
- Festlegen der Justierentfernung
Schießt man auf eine Feste Entfernung, sollte man natürlich auf diese Entfernung Justieren. Alternativ werden Waffen mit Zielfernrohr i.d.R. auf 100m oder 200m justiert, seltener auch auf 25m.
Am vorteilhaftesten für die meisten Anwender ist die Justierung auf 100m. Diese Entfernung hat den Vorteil, dass Die Visierlinie bei korrekter Justierung die ballistische Kurve des Geschosses nur an einem Punkt berührt, nämlich auf 100m. Somit können sowohl Entfernungen unter 100m, als auch alle weiteren Entfernungen immer in die gleiche Richtung kompensiert werden und man muss nicht lange überlegen, in welche Richtung nun die Korrekturen am Glas erfolgen müssen.
- Ermittlung des mittleren Treffpunktes
Zur Ermittlung des mittleren Treffpunktes ist es nötig eine ungerade Anzahl an Schüssen, mindestens aber drei Schüsse, mit demselben Haltepunkt auf eine Scheibe abzugeben. Dabei sollte man den Anschlag so ruhig wie möglich halten. Der liegend oder sitzend aufgelegte Anschlag ist hierbei zu empfehlen, jedoch sollte der Anschlag genutzt werden, aus welchem später am häufigsten geschossen wird, da die Körperposition hinter der Waffe einen Einfluss auf die Streuung hat. Ja, es ist IMMER eine Streuung vorhanden, egal, wie ruhig man schießt. Auch sollte man sich von der Illusion trennen, immer exakt denselben Haltepunkt auf den Millimeter genau zu halten. Ziel ist es, die Bewegung auf dem Haltepunkt so gering wie möglich zu halten und dann kontrolliert den Schuss brechen zu lassen. 100 Prozent Bewegungslosigkeit wird man nicht erreichen und das ist auch gut so, denn im späteren Einsatz wird man die Waffe auch nicht aus der Schießmaschine heraus nutzen.
Sind die Schüsse abgegeben, erfolgt die Ermittlung des mittleren Treffpunktes, indem man horizontal und vertikal die Schüsse abzählt:
Bei 3 Schüssen zählt man 2 Treffer
Bei 5 Schüssen zählt man 3 Treffer
Bei 7 Schüssen zählt man 5 Treffer
usw. jeweils von außen nach innen. Von wo man dabei beginnt ist egal, solange man einmal horizontal und einmal vertikal zählt. Beim jeweiligen Treffer angekommen, markiert man diesen mit einer Linie durch den Mittelpunkt des Treffers. Dabei ist darauf zu achten, dass beim horizontalen Zählen eine horizontale und beim vertikalen Zählen eine vertikale Linie markiert wird. Der Schnittpunkt dieser beiden Linien markiert den mittleren Treffpunkt.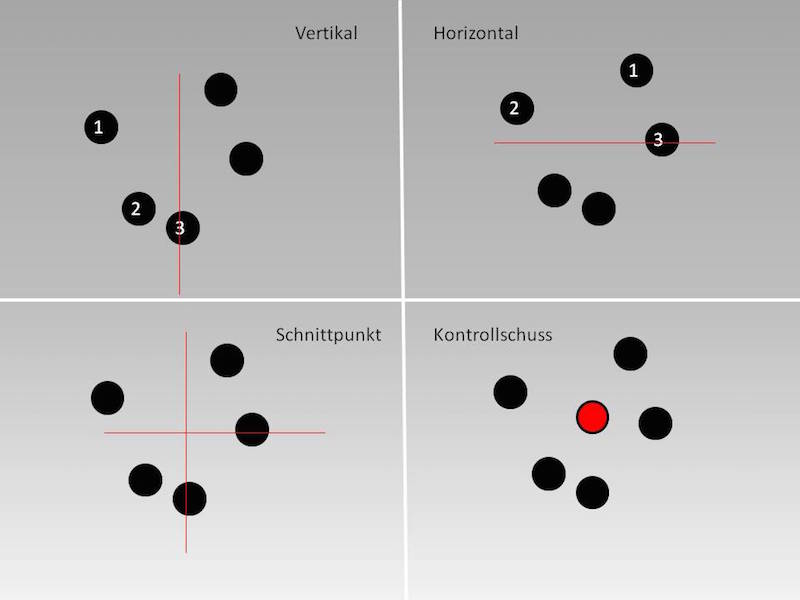
- Justierung des Zielfernrohrs
Hat man den mittleren Treffpunkt ermittelt, muss das Glas nur noch auf der entsprechenden Entfernung auf diesen eingestellt werden. Hierzu legt man die Waffe auf dem ursprünglichen Haltepunkt fest und stellt das Absehen mit der Höhen und Seitenverstellung auf diesen Punkt ein. Dabei ist es extrem wichtig, dass die Waffe nicht bewegt wird.
Im Anschluss wir ein Kontrollschuss abgegeben, um die Justierung zu verifizieren.
Die Justierung kann auch mit einem sog. Justierlaser erfolgen, jedoch kann dies maximal eine Grobjustierung sein, die das Glas auf der Waffe grob ausrichtet. Eine Feinjustierung muss immer im Schuss erfolgen.
Die Munition hat einen entscheidenden Einfluss auf die Trefferlage, insbesondere bei größeren Entfernungen. Besonders im jagdlichen Bereich hat sich daher die sog. GEE (günstigste Einschussentfernung) etabliert, welche sich aus der theoretisch ermittelten ballistischen Kurve des jeweiligen Geschosses ermittelt. Hierbei wird eine maximale Abweichung des Geschosses von +/-4cm von der Visierlinie angenommen. In diesem Bereich wird dann theoretisch die GEE ermittelt. Diese Angabe findet sich dann für die jeweilige Patrone in den Angaben des Herstellers und soll als Hilfestellung für den schützen dienen. Es sei hierbei angemerkt, dass diese Angaben auf Durchschnittswerten basieren und immer auch mit einer Lauflängenangabe versehen. Daher müssen diese Angaben nicht zwingend auf die eigene Waffe anwendbar sein.
Qualität
Eine inoffizielle Regel besagt, dass der Kaufpreis einer Waffe noch mal für das Glas investiert werden sollte. Auch wenn das vielleicht nicht ganz zutreffend ist, so sollte man sich darüber im Klaren sein, dass Qualität ihren Preis hat. Dabei geht es nicht nur um den Namen, sondern vor allem um hochwertige Linsenqualität und noch viel wichtiger um wiederholgenaue Einstellungsmöglichkeiten. Je nach Profession gibt es verschiedene Bauarten von Gläsern und unterschiedliche Bauarten der Justiermöglichkeiten. Gläser für den sportlichen Einsatz bedürfen i.d.R. keiner ständigen Nachjustierung, ebenso wie Gläser für diverse jagdliche Einsätze. Aus diesem Grund findet man hier eher Justierschrauben unter einer Abdeckkappe, die eher flach aufbauen, als hoch aus dem Tubus heraus zu ragen. Anders sieht es bei Gläsern für das Long Range schießen und den behördlichen Einsatz aus. Hier findet man fast immer hoch bauende Justiertürme mit außenliegender Skalierung und zumeist einem Sperrmechanismus. Diese Gläser sind für die häufige Nachjustierung und Korrektur auf verschiedene Entfernungen und Schusssituationen ausgelegt.
Gerade in diesem Segment kommt es auf eine hohe Qualität der Justierung, sprich die Widerholgenauigkeit an. Als Schütze muss man sich hier drauf verlassen, dass ein Click genau dem entspricht, was vorgegeben ist und nicht nur ungefähr.
Die Widerholgenauigkeit kann man mit einem einfachen Schusstest überprüfen. Hierbei wird auf i.d.R. 100m mit dem justierten Glas ein Schuss auf eine Zielscheibe (am Besten eine Justierscheibe mit MOA Aufteilung) abgegeben. Dieser sollte genau dort liegen, wohin man gezielt hat. Im Anschluss wird das Glas jeweils um das gleiche Maß (z.B. 2 MOA) nach rechts oben, Links oben, Links unten und rechts unten verstellt, wobei nach jeder Verstellung ein Schuss mit dem Haltepunkt des ersten Schusses abgegeben wird. Wichtig dabei ist, dass nach jedem Schuss wieder auf die ursprüngliche Einstellung (0) zurückgestellt wird und von dort aus die nächste Einstellung vorgenommen wird.
Hierdurch ergibt sich im Idealfall ein perfektes Viereck mit dem ersten Schuss als Mittelpunkt.![]()
Ist das Glas qualitativ hochwertig und damit wiederholgenau, sollte die Abweichung vom „Idealtrefferbild“ nur gering sein. Sind die Abweichungen jedoch unverhältnismäßig groß (Tagesform und eigene Schießfehler sind hierbei realistisch zu betrachten) sollte man sich mal Gedanken darüber machen, ob evtl. eine Qualitätsmange oder eine Beschädigung des Glases vorliegt. Zuvor ist natürlich die Justierung des Glases notwendig.
FAZIT:
Ein Zielfernrohr zu nutzen umfasst einiges mehr, als die bloße Montage und dann mit dem „Zielkreuz draufzuhalten“. Beschäftigt man sich ein wenig mit der Materie und versteht die dahinter stehenden Grundprinzipien, kann man sehr viel mehr damit anfangen, als einfach nur viel Geld auszugeben um toll auszusehen. Moderne Zielfernrohre und das riesige Spektrum an unterschiedlich gestalteten Absehen ermöglichen es, nahezu jede spezielle Anforderung in Sachen Entfernung, Ballistik oder persönlichen Ambitionen zu abzudecken.
Der Markt bietet für jeden Bedarf mindestens eine Lösung an, wenn nicht sogar mehrere und wird stetig erweitert.
Möchte man die Möglichkeiten, welche man mit viel Geld erworben hat ausnutzen, so empfehle ich dringend, sich mal mit der Ballistik von Waffe und Munition vertraut zu machen und sich einfach mal ein paar ballistische Korrekturwerte selber zu ermitteln. Das bringt nicht nur Spaß, wenn man auf einmal feststellt, wie simpel das Ganze doch ist, sondern übt auch das Verständnis für die Zusammenhänge. Mit diesem Verständnis bekommt man schnell einen ganz anderen Blick auf die Dinge und wird mit jedem selber ermittelten Wert besser.
Natürlich kann in einem solchen Artikel nicht die Gesamtheit des Schießens mit Zielfernrohren behandelt werden, da dieses Feld sehr viel umfangreicher ist und den Rahmen eines einfachen Artikels sprengen würde. Dies ist auch nicht das Kernthema dieses Artikels, so dass ich darauf verzichtet habe auf die faszinierenden Einzelheiten der Anwendung einzugehen.
Nächster KL-STRATEGIC Kurs: ZF Gewehr 1 – Grundlagen, 28.10.2017, MSZ Ulm
In diesem Sinne – train as you fight
Khi Pa
Teil1: Alles im Griff
Teil2: Der Anschlag
Teil3: Der natürliche Haltepunkt
Teil4: Die Augendominanz
Teil5: Die Abzugsarbeit
Teil6: Der Arbeitsbereich
Teil7.1: Zielen, die Gretchenfrage
Teil7.2: Zielen, alles auf den Punkt gebracht
Teil7.3: Was Tun Mit Zielfernrohren
Teil8: Sichere Ladetechniken für Pistolen und Revolver
Teil9: Sichere Ladetätigkeiten für Flinten
Teil10: Sichere Ladetätigkeit mit der Selbstladebüchse
Teil11: Alles über Ausrüstung
Teil12: Heimtraining
KL STRATEGIC im INTERNET: http://kl-strategic.com
KL STRATEGIC auf FACEBOOK: www.facebook.com/KL-STRATEGIC

SPARTANAT ist das Online-Magazin für Military News, Tactical Life, Gear & Reviews.
Schickt uns eure News: [email protected]
Werbung
Hol Dir den wöchentlichen SPARTANAT-Newsletter.
Dein Bonus: das gratis E-Book von SPARTANAT.