Hol Dir den wöchentlichen SPARTANAT-Newsletter.
Dein Bonus: das gratis E-Book von SPARTANAT.

HOW TO: Das Tarp Lean To
Heute wollen wir Ihnen zeigen, wie Sie schnell Ihr Tarp oder Poncho als "Lean To" mit einer Spannschnur aufbauen können - HIER finden Sie die Bastelanleitung. Fangen wir an!

Heute wollen wir euch zeigen, wie ihr mit der Spannschnur – HIER geht es zur Bastelanleitung – euer Tarp oder einen Poncho schnell als „Lean To“ aufbauen könnt. Los gehts!

Zunächst einmal was ist das „Lean To“? Hier spannt ihr eure Plane an den vier Eckpunkten so ab, dass zwei (meist) davon am Boden befestigt sind und zwei an Bäumen. Dadurch entsteht eine geneigte Fläche unter der ihr vor der Witterung geschützt seid.

Das wollen wir nun umsetzen. Also suchen wir uns einmal zwei Bäume die mindestens so weit auseinanderstehen wie unser Tarp breit ist. Breiter ist natürlich besser. Zwischen diesen Bäumen spannen wir unsere Spannschnur.

In die Karabiner der Spannschnur hängen wir je eine Ecke des Tarps ein. nun können wir – dank des Prusikknotens – das Tarp straff spannen.
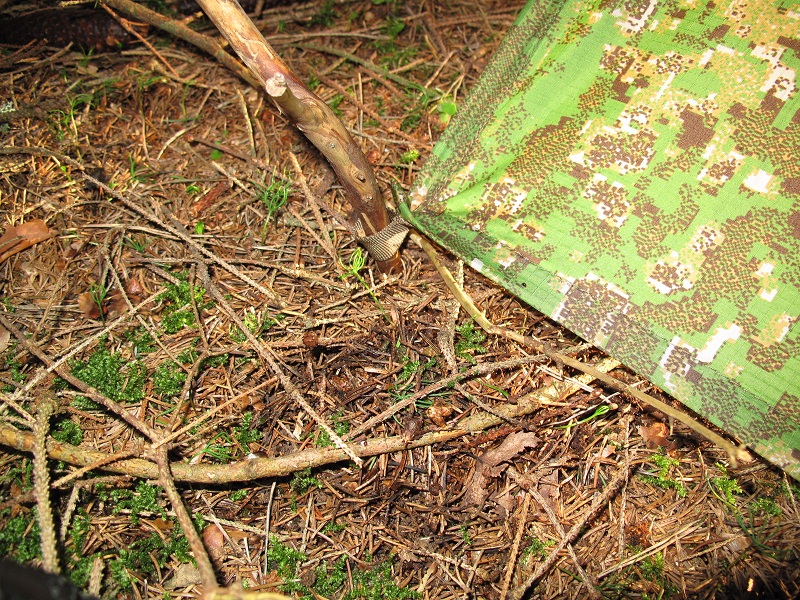
Mit Heringen oder angespitzten Stöcken verankert ihr die beiden anderen Ecken fest im Boden und schon ist das „Lean To“ fertig. Wir sagten doch zu Anfang, dass es einfach wird.

Wer ein großes Tarp mit 3x3m mit hat, kann sich auch ein „Lean To“ mit Boden bauen. Im Bild seht ihr das Supertarp von Helikon-Tex. Der erste Schritt ist der gleiche, also Schnur spannen und Tarp einhängen. Nun spannt ihr aber nicht die die beiden freien Ecken nieder, sondern die Mittelpunkte.
Dadurch bleibt euch ein rund 1,5m breiter Boden zur verfügung den ihr einfach noch vorne unter das Schrägdach zieht. Fertig ist der Boden. Natürlich könnt ihr auch die Viertelpunkte nehmen, dann habt ihr etwas weniger Boden, dafür mehr Dach.
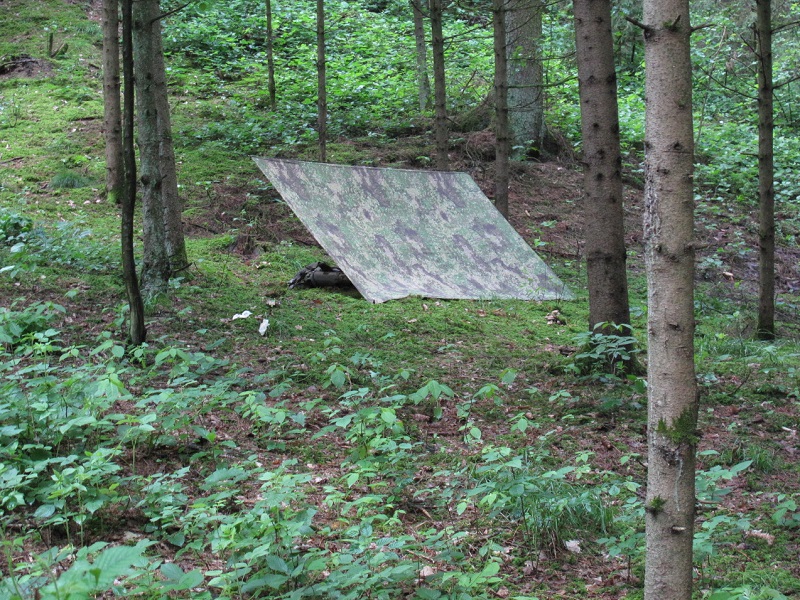
Das war das „Lean To“. Es eignet sich eher als Schattenspender und hat bei Wind oder stärkerem Rgen keine so gute Schutzfunktion. Da empfiehlt sich das „A-Frame“, dass wir euch nächstes mal näher bringen wollen. Hier seht ihr den Aufbau des „Lean To“s in bewegten Bildern.
SPARTANAT ist das Online-Magazin für Military News, Tactical Life, Gear & Reviews.
Schickt uns eure News: [email protected]
Werbung
Hol Dir den wöchentlichen SPARTANAT-Newsletter.
Dein Bonus: das gratis E-Book von SPARTANAT.